

half-square triangle quilt tutorial
We get a lot of questions about what to do with pre-cut fabric, so I thought I’d share one of my favorite and most easy projects to do with pre-cut squares like Layer Cakes and Charm Packs: half-square triangles!
This tutorial will show you how to make a quilt using:
- 1 printed Layer Cake
- 1 solid Layer Cake
Yup, that’s all you need!

1. Take one of those Layer Cakes and draw a line with a ruler from one corner to the opposite corner on each of the 42 squares.

2. Match each solid square with a printed square, right sides together…

…and pin. I’m usually not much of a pinner, but since you’re sewing on the bias it will help keep everything lined up right. I would have used 2 pins at a time, and my mom would have used 4, so I compromised and used 3 pins on each pair of squares.

3. Sew 1/4″ away from your marked line along one side. Be careful not to tug the fabric along the bias (the direction your line is drawn) as you sew or your squares will get distorted.

As with most piecing, no backstitching required. And you can chain piece these–just line up your squares and sew them one right after another without cutting your threads.

4. Sew 1/4″ away from the marked line on the other side. Here’s my long chain of squares all piled up ready to be sewn again.

I have a 1/4″ presser foot so that line runs right along its edge.

Your squares will pile up all pretty-like behind your sewing machine. (Gratuitous fabric photo.)

5. Cut each square along the marked line.

Now you’ve got two half-square triangle blocks, folded in half.

6. Set your seams and press toward the darker fabric (in this case it’s the printed fabric). Now, here’s my mom’s pressing trick: Set your seam with the darker side up…

…then without moving the block, open up the darker print and press from the front. This just makes it extra efficient, your seam will be pressed toward the print, and pressing from the front ensures everything looks just right. TIP: don’t run your iron along the direction of your seam, because that is the bias and your fabric will stretch and your block will no longer be square. Instead, move your iron with the grain of the fabric, which means it will cross your seam at an angle.

7. Arrange your blocks. This is the fun part! There are a lot of possibilities to create different patterns in your layout with half-square triangles, depending on which way your rotate your blocks. You can do diamonds…

…pinwheels…

…zig zags (or chevron stripes as I like to call them)…

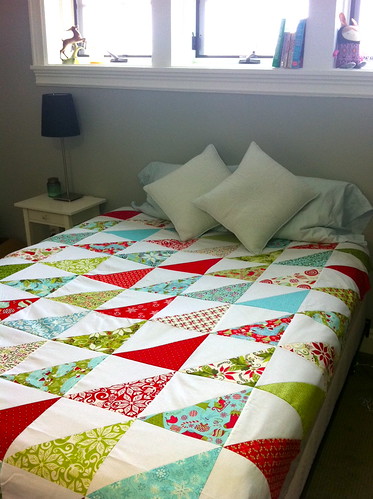
…or simple aligned triangles, which is what I decided to do. Feel free to get creative with this and see what you can come up with.

I didn’t want to lay out my entire quilt, so I sorted my blocks into piles by color and pattern scale. As I sewed my rows together, I could grab about one block from each pile per row, to keep it semi-random.

A NOTE ABOUT QUILT SIZE: 2 Layer Cakes = 84 blocks. The most efficient use of these blocks is to sew a square quilt of 9 blocks x 9 blocks and have 3 blocks left over. This gives you an 85.5″ x 85.5″ quilt, which is just barely big enough for a queen bed. Since there were a couple white prints in my printed Layer Cake and that would make for some funny blank looking spots in my quilt, I eliminated those and used a total of 80 blocks for an 8 block x 10 block, or 76″ x 95″ quilt. (Now that I think about it, a couple random all white squares could have looked kinda cool in this quilt.)
8. Sew blocks into rows. An easy way to do this is to sew pairs together, then sew pairs-of-pairs together, and go on like this until you have a full row.
As you pair up your blocks, make sure that the point created by your triangle hits right in the corner of it’s mate.

9. Press seam allowances to one side, with blocks in each row going the same direction, but alternating direction with each row. This requires you to set your rows in order. Then blocks in odd rows will all get pressed one way, and even rows the opposite way. That way, your seams will butt up and match nicely when you sew your rows together. Here are my first few rows laid out:

10. Sew rows together. You can do this in the same manner you sewed your blocks together, first creating pairs of rows, then, sewing those sets together.
Be as picky as you want to be about your points. I say, if they’re not perfect, don’t worry about it. But it’s not hard to aim for pointy points on this one. The place where you’re aiming for you seam to cross is that point where the triangle meets the vertical seam. TIP: sew on the side where your seams are so you can see where the triangle and vertical seams meet, that way you can aim to sew right across that point. This makes matching your points much easier. (Sorry, I don’t have a photo of this.)

Here you can see my first 6 rows sewn together, 4 more to go.

11. Stay-stitch around the outside of your quilt. This is just a regular stitch about 1/8″ in from the edge of your quilt to prevent your seams from coming undone during quilting. Your machine quilter will thank you.

I think I’m the only one who knows which direction is up on this quilt, just ’cause I’m the only one who cares. I decided I wanted my triangles oriented on the bottom right, for no particular reason other than that’s how I liked it best this time around. The nature of this layout is such that some of the designs in the prints are right side up, and some aren’t, but who cares.

You can see that the very same method works great with Charm Packs. One printed Charm Pack and one solid Charm Pack will make a baby quilt.

My mom made this one, and with a 8 block x 10 block layout, it finishes to 36″ x 45″.

There you have it! If you make one of these or have a fun variation on this quilt, leave a comment and add a photo of your project to our Flickr group!