On Parade Mini Quilt
March 10th, 2012

As we await the release of our feature in Quilt Sample Magazine (since you asked–it’s out May 8), we are marking our countdown on the 10th of each month and celebrating being named a top 10 quilt shop by sharing a tutorial or pattern. Last month it was our heart bunting, and this month it’s my beloved On Parade Mini Quilt, featuring Sarah Jane’s On Parade embroidery.
We’ve even got kits with everything you’ll need, right down to the floss and the batting. This quilt has made me smile more than most quilts I’ve ever made, and I hope you enjoy it too! View the instructions here.

Tags: children at play, on parade, quilt sampler, sarah jane
Posted in free tutorials projects & patterns, kits | 2 Comments »
longarming
March 7th, 2012
I’ve been spending more and more time quilting on the longarm, and having more and more fun with it. I’m finding that I have my own style and what I like doing best are designs that feel organic as I make them. These are a few of my favorites.


 I’m keeping more photos of my quilting in this Flickr set, btw. Many customer quilts and a few for display in the shop. (Thanks, everyone who’ve let quilt your quilts!)
Throughout this process I’m learning a lot. And since we get lots of questions about this sort of thing, I thought I’d share some tips for getting the most awesome quilt possible when sending it to a longarm quilter. And for more info on our longarm services, check out this info sheet. Here we go.
-
Use high quality fabric. Budget fabrics can have a brittle texture. What does that mean for quilting? The needle may break the fibers rather than pass between them, creating tiny holes, and the batting can beard through on the back.
-
Square up as you go–each block, each border. You don’t want to have to trim any of that quilt off before the binding goes on!
-
Don’t force the borders. When using a pattern’s border measurements, you may end up with a wavy border, or one that’s pulled to tight. This doesn’t mean you did something wrong, but everyone’s seam allowances can vary by a hair, and those hairs can add up to a measurable difference. Your actual quilt dimensions may not be exactly like the pattern, so you’d be forcing the wrong size of border to fit your quilt. Cut your border big, then trim it off/square it up after sewing it on.
-
Press from the front, not just the back. Press as you’re piecing, and press the entire quilt again when it’s all finished. You can spot folds in seams from the front that you might not see on the back. You’ll avoid tucks and misshapen-ness in your finished quilt.
-
Stay-stitch finished quilt tops by sewing around the entire quilt top with a regular stitch length and 1/8″ seam allowance. This will keep things from stretching and prevent seams from coming unraveled between now and when the quilting is done.
-
Trim threads on both the front and back. Don’t pull–you don’t want any seams coming undone! Stray threads showing through your quilt can be distracting. This is more easily done before the quilting catches all those strays.
-
Check for loose or undone seams. Sometimes we miss these things, and it’s always easier to re-sew it before it’s quilted than try to repair it after.
-
Make quilt backs big and square them up. The quilt back should be at least 4″ larger on each side than the quilt top. This allows for proper loading on the longarm, and gives enough room for the way everything is taken up in the quilting. The sides of the back should also be exactly perpendicular to each other–a lopsided backing will be lopsided when it attaches to the quilt on a longarm. We don’t want any puckering or stretching! Don’t be afraid to use minky, interlock knits, or to mix and match different fabrics for the back. Pieced backs and different textures make for the opposite of boring.
These are also not bad to follow if you’re quilting yourself on a domestic machine or by hand. I do have to mention that for those times when I’m not using the longarm for the quilting, 505 Spray & Fix temporary adhesive is by far my favorite way to baste these days. It’s faster and more reliable than pinning or thread basting, and it washes out. It’s re-positionable so you can adjust and smooth out your quilt as needed, yet it holds strong enough that I can tote around a project and not worry about it shifting.
There you have it. Do you have any of your own tips?
Tags: longarm, tips
Posted in learnin, machine quilting | No Comments »
skippy
March 4th, 2012
Let’s take a minute to talk about our new favorite little guy in the shop. This is Skippy The Elephant.
 He’s not shy. Here’s his backside.
 He’s just making everyone so happy around here with his adorableness. We owe him to Shelley, who appliqued, pieced, and quilted him. Shelley’s our go-to girl for applique–she’s become an expert at neat and clean machine methods. See, you can hardly see that tiny machine blanket stitch!
 She quilted him with a simple 1-1/2″ cross-hatch similar to the version in the book. Skippy comes from Quilts, Baby! by Linda Kopp, which is one of those books where there are SO many quilts you want to make in it that it’s a steal since it costs so much less than multiple patterns would be (just like this one.) Our version uses prints from the Fifi & Fido collection by Anna Griffin, and a few Kona and Bella solids.
We’ve got kits either with or without the book (for those who already own Quilts, Baby!), and it even includes everything for the pieced back.
 We’ve already had requests for the giraffe version as seen in the book, and a pig version. We’ll have to see about that!
Tags: anna griffin, fifi & fido, linda kopp, quilts baby, solids
Posted in kits, samples, show and tell | No Comments »
sweet ride
February 27th, 2012
For as popular a project as these are, I had never made a car seat canopy until recently. Guess I need more babies in my life? I sort of combined the tutorials on Cluck Cluck Sew and Make It Do, and my fabric choices were a Lecien print and with Moira and Ruta for the back and tabs.  I got a little idea for making it reversible, but chickened out. I’ll let you know if I figure out how to make it work.
And this is who you would find inside: my new niece, Milly! (Cue: Awww.)

Posted in show and tell | 1 Comment »
feb cvmqg
February 24th, 2012
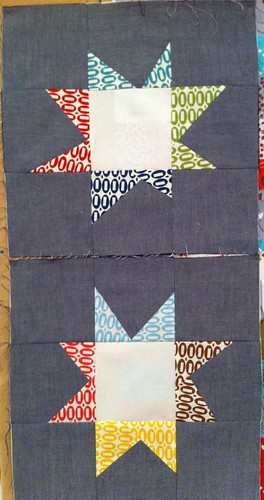
Just a quick post to show you what the Cache Valley Modern Quilt Guild was up to in February. We’ve been working from the book Modern Blocks for the last couple months. This time we tried the star block with a wonky method and it’s so fun to do. I’ve got my star blocks sewn into a little quilt, but gotta add something before I show the final product here. It seems like the projects we start in Modern Guild are some of the few that I’m actually stoked on enough to finish quickly. Or maybe it’s that I only make them into tiny quilts.
 Kathy’s Modern Meadow block:
 Stars by Joyce:
 I should try smaller points like those, so cute!
Adrianne also showed off her new table runner made with a retro prom print and a solid charm pack. (Pattern is All Decked Out by Sweetwater.)
 Keep up with the guild or find out about our meetings by following .
Posted in modern quilt guild | No Comments »
tango stripe
February 12th, 2012
Tags: jean wells, kaffe fassett, kits, westminster
Posted in show and tell | 1 Comment »
valentine’s bunting
February 10th, 2012

Today is an exciting day. We have a tutorial featured for the first time on Moda Bake Shop! We made this heart bunting for them with a Domestic Bliss charm pack, and guess what–it takes no sewing whatsoever. Low effort/high payoff Valentine’s Day decorations! Check out the simple step-by-step instructions here.

By the way you may have noticed that today’s date is the 10th. Since Quilt Sampler Magazine named us a Top 10 quilt shop, each month on the 10th we’ll have something fun here for you, as we count down to the magazine release date in May. Only time will tell what next month holds!
Tags: moda bake shop, pre-cuts, quilt sampler
Posted in free tutorials projects & patterns | No Comments »
winter sewing
February 5th, 2012
We didn’t have snow for Christmas, but then finally a couple weeks ago it would not stop snowing! So our intern Sarah made some cute snowflakes for our windows.


All the Wintery wet and cold has made us just want to hunker down and snow, er sew. I actually typed it like that. We’ve been planning new quilts and getting old ones finished. We’ve been hanging new quilts…
I’ve been calling this Firecracker Play. Sounds dangerous, huh. Our friend Mary made it for us to hang in the shop with Jaybird’s Firecracker quilt pattern & Sarah Jane’s Children at Play prints, with some American Jane mixed in there. We’ve got kits available, and you can bundle it with the Lazy Angle Ruler (not required but recommended in the pattern) which Mary reported that she loved. I particularly like that these firecrackers spin both ways.

And of course we need warm flannel in the Winter. This easy baby quilt uses the Irving Street flannel collection with Valori Wells’ Lion’ Around pattern, also in a kit.

I almost had to steal it off the wall for my new baby niece. It’s a good thing my sister Rosie already made this for her using the purple & pink prints from Outfoxed. She designed and made it all herself, and even quilted it on the long-arm–her first time ever!

Ah, she makes me so proud. We want to see what Winter sewing you‘ve been working on. Add your photos to our Flickr pool!
Tags: children at play, irving street, jaybird, kits, outfoxed, valori wells
Posted in samples | No Comments »
half moon modern quickie
February 1st, 2012
When each new fabric line comes in, I’m antsy to sew something with it. But it’s not actually that often that I get to finish a project out of anything in a timely manner. (Thank goodness for all our wonderful shop display sewists!) But when I found myself fondling Half Moon Modern every single day, I felt justified in starting a new project. So I set out to modabakeshop.com for something quick using pre-cuts, and found just the thing: a tutorial for a quilt called Home Sweet Home. Here’s my version, made with just 2 charm packs and some Bella White Jelly Roll strips.

And speaking of being antsy, I’ve been pretty impatient with binding lately, so I bound it completely by machine. I love beautiful hand-binding on quilts that deserve it. But sometimes I just want it done, and if it will be well-used I figure a machine binding will be especially sturdy anyway. I have a quilt at home that’s been waiting for it’s hand finishing for a year, while I’ve finished several machine bindings recently. After trying a few different techniques, I’ve been most often using the method I found in this tutorial from A Quilt Is Nice. It basically involves sewing the binding first onto the back of the quilt, then folding it to the front and edge-stitching it down just inside of the first stitching line. Here you can see what my binding looks like from the front on the left, and from the back on the right.
 I like doing it this way for a few reasons: 1-Even though you can see the stitching on the front, since you’re sewing it from that side you can make sure it’s nice and neat. The imperfections are on the back, where I won’t see them. 2-I don’t have to worry about not catching the binding, like I do with the stitch-in-the-ditch method (which is still great, I’m just not very good at it.) 3-I don’t have to pin. Sometimes I use my Wonder Clips, but mostly I just fold and hold with my fingers as I go.
I know not everyone is with me on the machine binding, but I’m curious to know if any of you have machine binding tips or methods you like.
Tags: binding, half moon modern, moda
Posted in samples, techniques | No Comments »
quilt sampler preview
January 6th, 2012
Anyone who visited the shop at the right time on a certain day last September was probably a bit confused to find the lights off and cords all over. They camera crew were mostly pretty stealth and quiet, but the lighting was the giveaway. Some may have figured out that those shots were going to be for Quilt Sampler magazine! The crew was a blast, we even got to go out and celebrate with them at the end of the long day.

Part of our feature in the magazine will include a quilt pattern we designed. The quilt itself is actually in Iowa right now so they can style & shoot it. So Monday when we had our big live announcement we unveiled a miniature version. Right now we’re calling it Pencilmania, and for this version we used a bunch of polka dots that are in the original, larger version.

Kathy and I have both always loved school supplies. Back-to-school shopping was so exciting, and we still love picking out new pens or getting markers in every single color. So this quilt really suits us, and is sort of the patchwork version of neurotically arranging your writing utensils in color order. Personally, I think it would make a really adorable gift for a child’s teacher. We’ll be making several versions of the pattern, who knows what form it might take next!
Tags: mini quilt, pencil quilt, quilt sampler, rainbow
Posted in cool new stuff | 6 Comments »